Creating a "Privacy" SSID with pfSense, VLANs, and a VPN
EDIT (4/12/18): Thanks to the anonymous commenter for the suggestion not to use a public IP range for the new subnet… post is updated w/ a private IP range.
A while ago I was thinking that it’d be cool to have a wireless network at our house that was a little more “privacy oriented”. My wife and I have both had situations where we’ve searched for something, and received a barrage of related, sometimes embarassing, advertisements on all platforms (think Google, Facebook, Amazon, and even things like Spotify ads!)… not cool.
The idea here is that if you knew you wanted to Google something1, but you didn’t necessarily want so many folks to know what you were searching for, you could connect to that SSID and conduct your search. You would, of course, also need to open an Incognito session in your browser so as to avoid divulging any unique cookies that Google or Facebook or whoever has already assigned to you. Of course, this isn’t going to be as “private” as using something like Tails, but I think it’d prevent the “getting ads you don’t want” sort of situations.
Setting up this “privacy SSID” was actually very easy, since my network was already mostly ready to support this sort of configuration, and I didn’t have to buy any new hardware because I was able to re-use some old stuff I had laying around. The rest of this post will document the setup, and you should be able to follow these steps to set up something similar on your own network, especially if you’ve already got a setup similar to mine.
That being said, even if there are mistakes below, I don’t consider myself responsible if you mess up your config and/or drop your Internet connection. Hopefully that doesn’t happen. Before beginning, I’d recommend taking a backup of your current, working pfSense settings by heading to Diagnostics -> Backup & Restore in the pfSense WebConfigurator.
Configuration
Basically the same as “pfSense VLANs with a one-NIC NUC & a TP-LINK TL-SG108”, except that pfSense has been updated (2.4.1-RELEASE), and it’s also running on a newer Intel NUC.2
Additionally, we’ll be adding VLAN Tag 20 to our configuration, which will host a new LAN network on subnet 10.0.11.0/24. We’ll assign a new port on the TP-LINK TL-SG108E to that VLAN, and we’ll plug a wireless access point (AP) into that port to allow devices on to the 10.0.11.0/24 subnet. pfSense will be responsible for assigning IPs to devices joining that subnet.
In my case, the aforementioned wireless AP is just a cheap-o TL-WR841N I had lying around. My TL-WR841N is running openWRT version 15.05.1 in access point mode. I’ll leave your access-point setup up to you, since you’ll probably be using something different from me. Make sure you use WPA2 encryption, and make sure you’re running the latest firmware available for your AP – it’s better to have the KRACK patches (and other security patches, too, of course) than to not.
All the traffic from any devices on 10.0.11.0/24 will be routed through a VPN, obscuring your real IP address. I’m using Private Internet Access (PIA), but these steps should be compatible with any OpenVPN-based provider.
1. Update VLANs on TP-LINK TL-SG108E
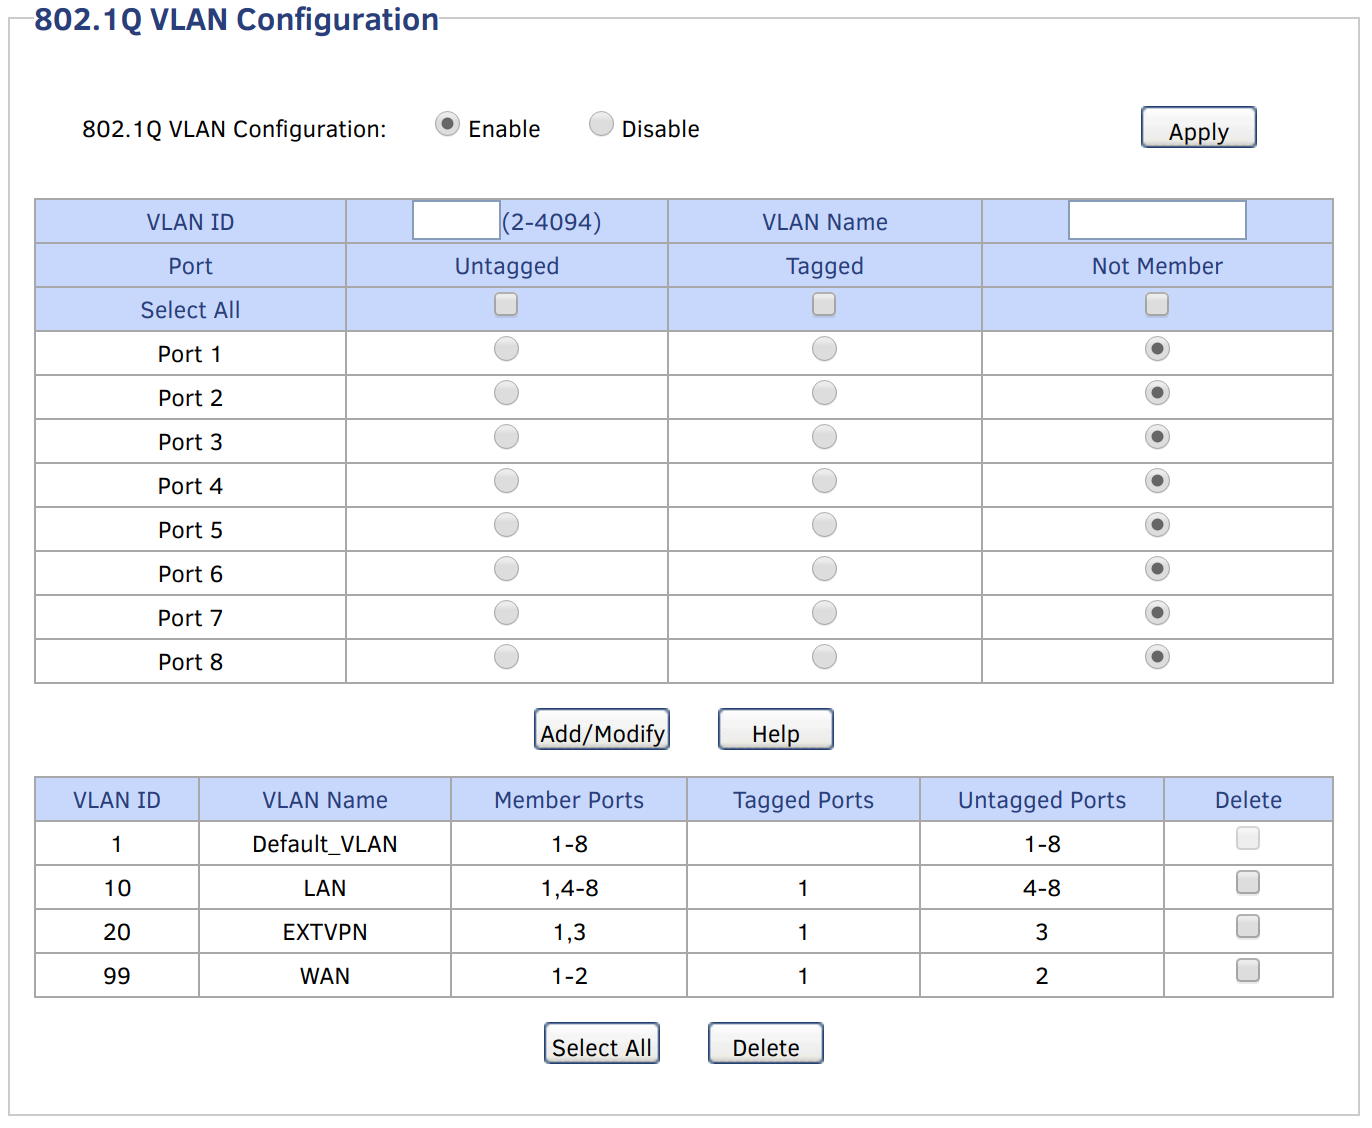
See “pfSense VLANs with a one-NIC NUC & a TP-LINK TL-SG108”… I’ve simply modified those settings so that Port 3 is reassigned from VLAN 10 to VLAN 20. Your VLAN settings should look like this:

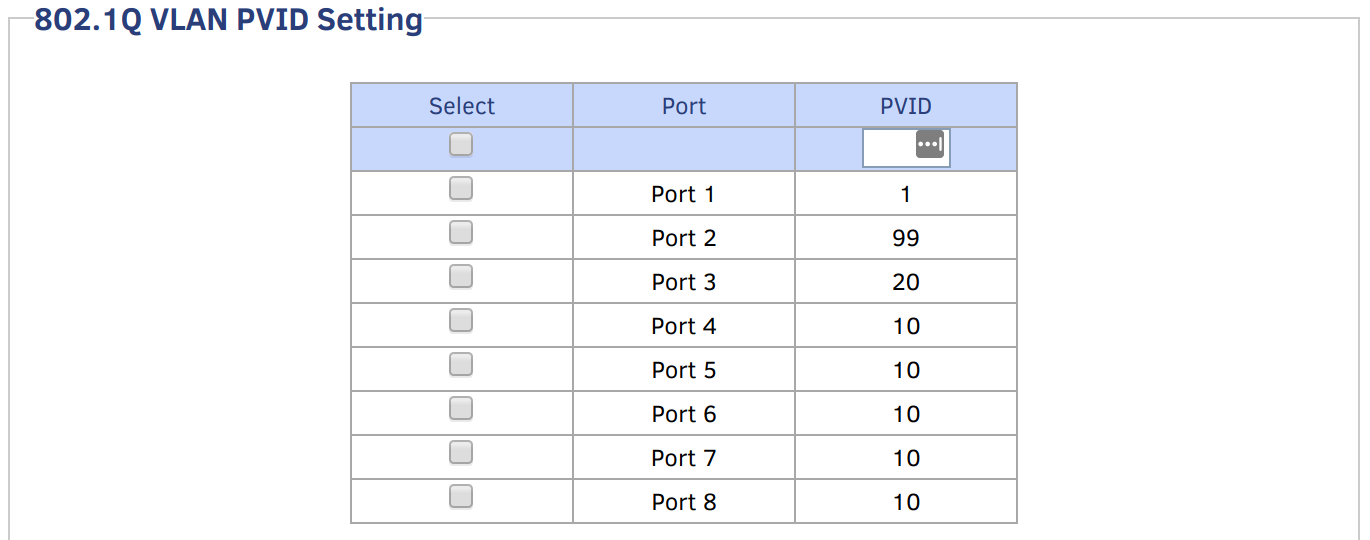
Since the AP will be sending untagged traffic to Port 3, we need to tell the switch to add VLAN 20 tags to packets coming in on Port 3, so that pfSense knows what interface that traffic should be handled on. Change your PVID settings to look like this:

You’ll note that I’ve given VLAN 20 a friendly name of EXTVPN, meaning “external VPN”. Maybe not the most intuitive name, but the idea is that it’s a VPN external to my network…
Before you move on, make sure to Save Config.3
2. pfSense
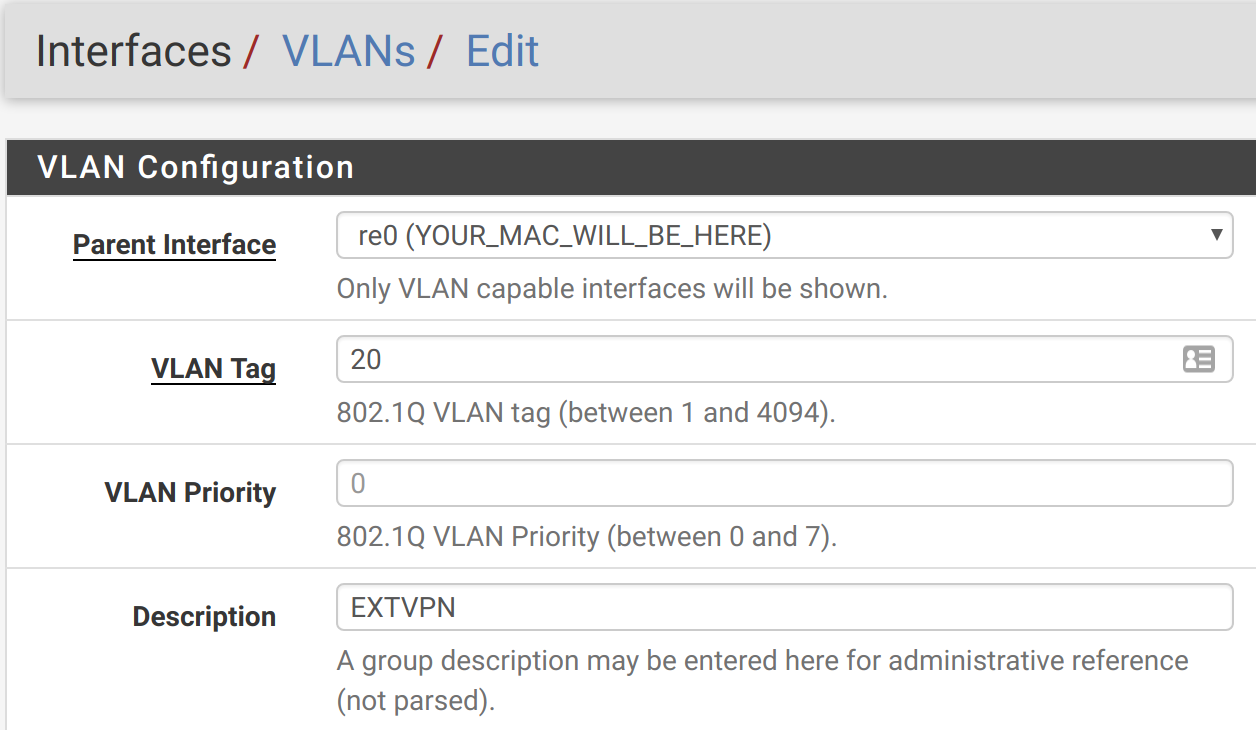
Head to Interfaces, and click on the VLANs tab. Add a new interface, using the VLAN 20 tag we’ve set up in the switch. I’d recommend using EXTVPN as your description, too, to make it easier to keep track of things.


As in “pfSense VLANs with a one-NIC NUC & a TP-LINK TL-SG108”, you’ll need to configure your pfSense interfaces. Mine look like this, now:

You will also want to configure EXTVPN to provide DHCP leases to clients connected to it. We want all traffic on the 10.0.11.0/24 subnet to flow through the VPN. So, make sure that EXTVPN is available on 10.0.11.0:

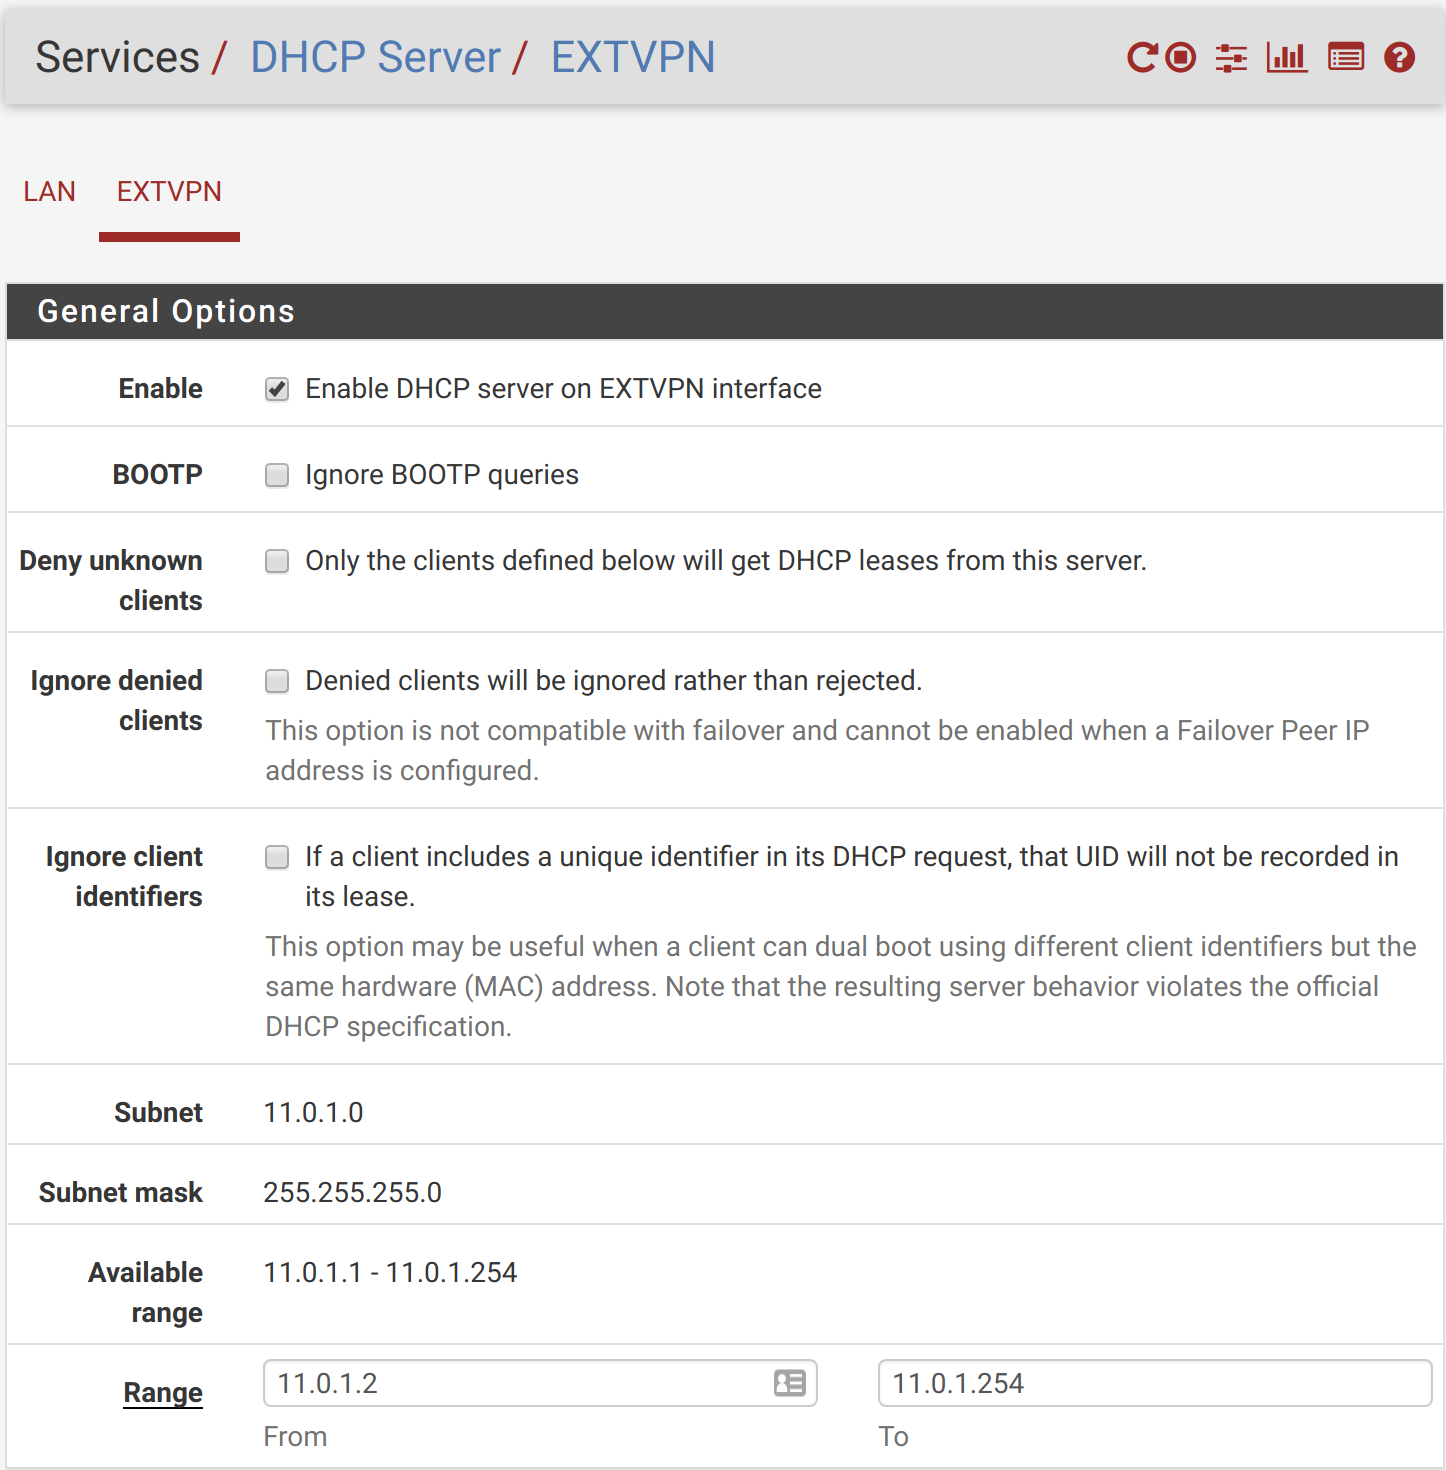
To actually enable the DHCP server on that interface, head over to Services -> DHCP Server. Click on the EXTVPN tab, and configure as follows:

Save/apply your settings. Your new EXTVPN interface should be “UP” on your main status page (assuming you’ve got that widge enabled):

The last thing we need to do here is enable the DNS Resolver on the EXTVPN interface so clients can resolve domains to IPs. Head to Services -> DNS Resolver, and add the EXTVPN interface to the selected interfacess (Ctrl+Click):

Save/apply your settings.
2. Plug your AP into your switch
Attach it to Port 3 of the TL-SG108E. It should pull an IP address in the 10.0.11.0/24 subnet from the DHCP Server running on EXTVPN – if not, assign one statically in your AP config, and adjust your DHCP lease pool accordingly (i.e. if you assign your AP 10.0.11.2, make sure your DHCP lease pool is 10.0.11.3-254).
If you connect a client to the wireless network provided by the AP, your client (e.g. your laptop) should get an IP in the same 10.0.11.0/24 subnet. Your client should be able to browse the web at this point, but none of the traffic will be routed through a VPN yet – we’ll set that up next!
3. Add PIA VPN client to pfSense
Back to pfSense. We need to set up an OpenVPN client in pfSense. This VPN client will serve as a pseudo-WAN for traffic in the 10.0.11.0/24 subnet. If you’re using PIA like me, you can just follow their guide specifically for pfSense, as long as you make a few important tweaks:
Since we’re not routing all traffic through the VPN, though, make sure to check the
Don't pull routescheckbox.
In your Firewall -> NAT -> Outbound rules, you do not need a copy of every WAN rule, as suggested in the PIA article. Instead, you only need rules for the 10.0.11.0/24 subnet:

When everything is working, you should have a new interface in pfSense with an IP address:

4. Testing
If you connect to the AP we configured above, you should get a local IP address in the 10.0.11.0/24 range. You should be able to browse the Internet, but since you’ve configured VLANs, firewall rules, and an OpenVPN client, your traffic to the Internet should be routed through a remote VPN. You can verify that your traffic is being routed through the VPN by checking your external/public IP address – Google can do that for you. The IP Google shows you should be different from the external/public IP assigned to you by your ISP. Verify that when you’re connected to the new AP/SSID you just set up your external IP is different from your external IP when you browse from your regular network/AP/SSID.
If you can’t get to the Internet, double-check all your settings. I was having issues initially, until I realized I was missing an “Allow All” rule from EXTVPN to PIAVPN – oops! After I added it, everything worked:

A note on DNS leaks
If you check to see if you’re leaking DNS on ipleak or DNSLeak, they might tell you that you’re leaking your IP. I consider this to be a non-issue for the following reasons:
- If you’re using pfSense’s DNS Resolver (which I recommend you do), your DNS requests are being resolved on your pfSense box. I frankly haven’t spent enough time learning about DNS to know what information might be leaked here, but my intuition and some forum posts4 would lead me to believe that it’s not as bad as forwarding your DNS requests to your ISP DNS servers. Besides…
- … this post/setup is not intended to be a full-on tin-foil-hat solution anyway. My highest priority is preventing advertisements for things I search for (health symptoms, gifts for my wife, etc.) from being blasted back at us. If you have more serious security/privacy concerns, you’ll probably want to be routing 100% of your traffic through a VPN, or perhaps even through TOR.
Final Thoughts
Not remembering to use the “privacy” SSID when you should is one of the biggest faults in this setup. We did try routing 100% of our traffic through the VPN at one point, but Netflix and a whole bunch of other things (like banking websites) didn’t like that. Selectively whitelisting Netflix et al. so that their respective traffic is not routed over the VPN is sort-of possible, but it’s a huge pain, and subject to breakage (Netflix IPs change over time, lists/domains need to be updated, etc.).
Also, I’m really not sure how effective using a VPN is. People like to talk up the privacy benefits of VPNs, but I haven’t done any actual testing to see if we’re getting less/fewer targeted ads by using the VPN. It’s possible to fingerprint browsers reasonably accurately regardless of the browser’s IP address, but I’d hope that Incognito mode would help with that. If I don’t find myself using the VPN/privacy SSID often in the coming weeks/months, I’ll probably disable it and not renew my PIA subscription.
If nothing else, this was a good exercise in remembering how my network is configured. :) Next, I’ll probably set up a network for IoT-ish devices to live on… will be interesting to see how much breakage that causes (for example, I’m not expecting the Google Chromecast to play particularly nicely if it’s on a separate, [semi-]isolated subnet/VLAN).
…and you manage to prevent yourself from reflexively Googling it the instant it popped into your mind… ↩︎
The NUC6CAYH, which has a CPU that has the AES-NI set, as required by future versions of pfSense. The NUC6CAYH has two RAM slots, so if you put in two sticks, make sure they’re perfectly identical, or you’ll get an error like this. I got that error when trying to pair a ~3yr old 4GB Crucial stick with a brand new 4GB Crucial stick of the same spec. So, I switched over to 8GB (2x4GB) of Kingston HyperX RAM, which has been working wonderfully. ↩︎

