pfSense VLANs with a one-NIC NUC & a TP-LINK TL-SG108E
EDIT (01/01/2019): Here’s a link to forum thread with a newer/updated version of the Realtek Gigabit NIC driver mentioned below, which you’ll need if you’re running a recent version of pfSense. Happy New Year!
EDIT (11/26/2017): We recently upgraded to Gigabit FIOS, and the driver for the Realtek NIC inside the Intel NUC BOX6CAYH would crash periodically when it experienced sustained, relatively high (200Mbps+) throughput – the message I saw in the kernel logs was something like re0: watchdog timeout. Fortuantely, there’s a solution: install Realtek’s gigabit NIC driver for *BSD manually. I followed the instructions in that thread, and now I’m consistently pulling speeds upwards of 700Mbps, and haven’t experienced a single hiccup. I rarely see 900Mbps+, but I’m not sure if that’s a result of the one-NIC + VLANs, or just that not many servers are willing to push 900Mbps+.
EDIT (10/30/2017): I’ve recently upgraded to an AES-NI compatible Intel NUC, but all the rest of the stuff below is the same. In fact, I was able to pop the SSD out of my old NUC and into the new one, was up and running with no other configuration changes! Pretty sweet. I’ve also added a new post that builds on this configuration to provide a “privacy” SSID, using VLANs and a VPN – you can check it out here: “Creating a “Privacy” SSID with pfSense, VLANs and VPNs”
Introduction
Our gateway device is an Intel NUC, which has only one NIC. I added a USB3 NIC to serve as the WAN interface (with the internal NIC serving as the LAN interface). This worked fine until recently, when we tripled our Internet upload and download speeds. After the speed upgrade, our upload was great (150Mbps), but our download speeds seemed throttled at about 60Mbps. After a bit of troubleshooting, I concluded that the bottleneck was the USB3 NIC serving as the WAN interface – the driver pfSense was using seemed to be messing something up, and I couldn’t get it to play nice.
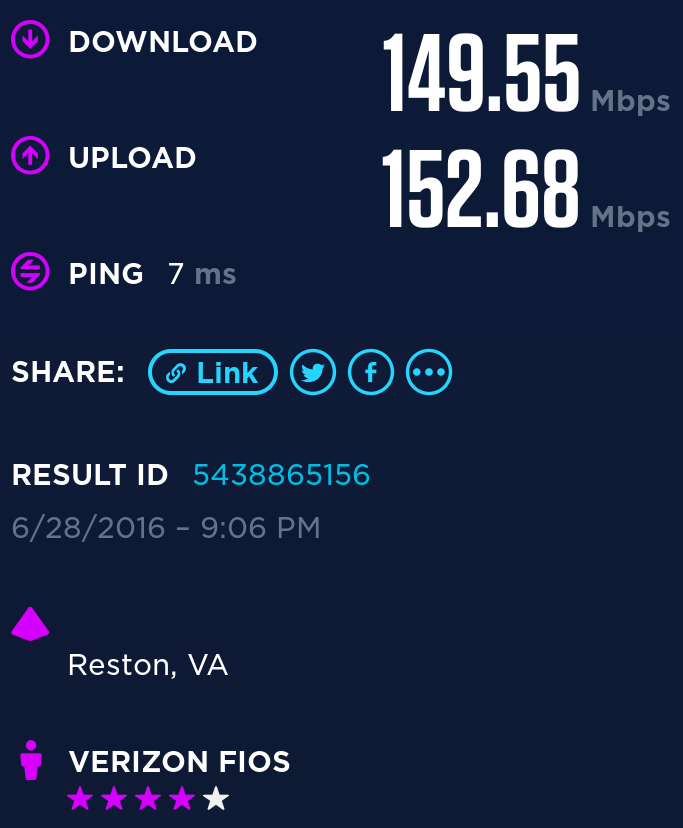
Rather than fixing the driver, I decided to ditch the problematic USB3 NIC and move to a one-NIC setup using VLANs, since we already had a managed switch (the TP-LINK TL-SG108E) on our network that was not doing anything special. We now have just two VLANs (one for WAN, one for LAN) operating off the NUC’s internal 1G NIC, and consistent 150Mbps+ upload/download speeds.
Configuration
The following is documentation about how I configured our network, mostly for my own future reference.
pfSense version: 2.3.1-RELEASE-p5
TL-SG108E firmware version: 1.0.2 Build 20160526 Rel.34615
VLANs:
- VLAN Tag 10: LAN network, 10.0.1.1/24
- VLAN Tag 99: WAN network, DHCP from ISP
1. TP-LINK TL-SG108E
We want the switch’s Physical Port 1 to be connected to the NUC’s physical internal NIC. We want the switch’s Physical Port 2 to be connected to the Internet (i.e. the FiOS OTN on the outside of our house). And we want the remaining 6 ports to be regular LAN ports that we can plug anything we want in to (i.e. Raspberry Pis, servers, etc.).
This switch’s VLAN interface is a bit weird in that everything seems to be centered around the VLAN IDs, not the ports, making it unclear on first inspection how one would tell Physical Port 1 that it will be handling VLAN IDs 10 and 99.
- Log in to the switch’s web configuration interface. The default username and password are
adminandadmin, respectively. I believe the default IP address is192.168.0.1/24, so you will probably either need to change your PC’s IP address to be within that subnet, or use the Windows-only Easy Configuration Utility. - (Optional) Once you are logged in, you may want to change the IP address to be within the range of your normal subnet (
10.0.1.0/24) so it is more easily accessible in the future. - VLAN -> 802.1Q VLAN
- Select the Enable radio button, and click Apply.
- Create the LAN VLAN rule:
- Enter
10in the VLAN ID box. - Enter
LANin the VLAN Name box. - Select the Tagged radio button for Port 1.
- Select the Not Member radio button for Port 2.
- Select the Untagged radio buttons for Ports 3-8.
- Click Add/Modify.
- Enter
- Create the WAN VLAN rule:
- Enter
99in the VLAN ID box. - Enter
WANin the `VLAN Name** box. - Select the Tagged radio button for Port 1.
- Select the Untagged radio button for Port 2.
- Select the Not Member radio buttons for Ports 3-8.
- Click Add/Modify.
- Enter
When all said and done, if you are following my setup exactly, you should have something that looks like this:

What we’ve done in steps 5 & 6 is tell the switch that it should expect tagged traffic coming from the device plugged in to Port 1, which will be our pfSense NUC, which will be configured to be “VLAN-aware” (see the next section for how to do this). Port 1 should expect to see traffic with VLAN tags 10 and/or 99
Ports 3-8 are a part of the 10 (LAN) VLAN, but they are untagged, which means that the devices plugged in to them will not be sending traffic with VLAN tags. This makes sense, since we’re not going to configure every device in our network to be VLAN-aware… think about an XBox or smart Blu-ray player or Chromecast. These things don’t even have interfaces for VLAN configuration.
Port 2 is expecting untagged traffic from the device plugged in to it (again, makes sense, since this device will be the Verizon FiOS OTN, which is an unconfigurable black box as far as we’re concerned). It is connected to the 99 VLAN, but directly to the 10 VLAN.
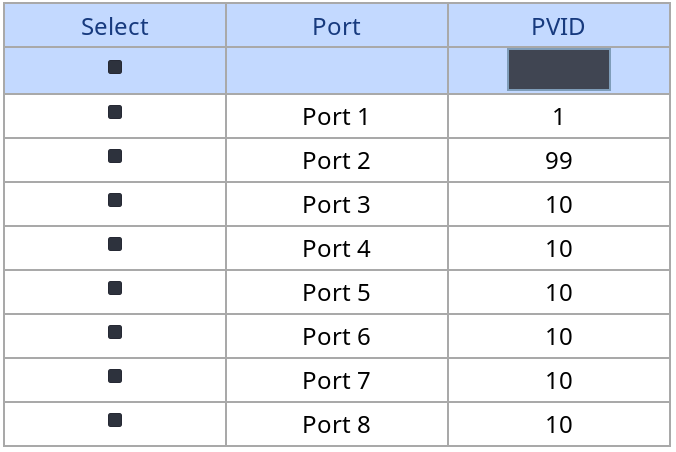
Because Ports 2-8 are expecting untagged traffic, we need to tell the switch to tag any traffic it sees coming in on those ports with the appropriate VLAN tag (99 in the case of Port 2, and 10 for Ports 2-8). Then, when pfSense sees this traffic, it will check the VLAN tag to see which interface (WAN or LAN) should handle it. We will do this by setting the switch’s 802.1Q PVID Settings.
- VLAN -> 802.1Q PVID Setting
- Enter
99in the PVID box, and select only Port 2. Then click Apply. - Enter
10in the PVID box, and select Ports 3-8. Then click Apply.
You should be left with something that looks like this:

Make sure to Save Config1, and then you can move on to configuring pfSense.
2. pfSense
Basically, just follow this guy’s guide (<– that link is dead, but you can find a copy of that article in the Wayback Machine.2); specifically, the pfSense portion of it, taking in to consideration that I currently only have two VLANs, not four. My configuration looks like the following:

3. Physical Cabling
Once you have pfSense and the switch configured, run a cable from Port 1 on the switch to pfSense NUC’s NIC. Run another cable from Port 2 on the switch to the Verizon OTN box, or equivalent. Plug your other LAN devices in to Ports 3-8 on the switch. At this point, barring any DHCP issues with Verizon, you should be in business!!
Internet speedtest on WiFi after VLAN setup:
